Dear readers, I am really happy with the stable traffic on this webblog for all these 4 years, and hope that you find the articles published here useful. However, I have migrated. My new project is dedicated to photography. Enjoy: https://backseatzzz.wordpress.com/
_/、
( ゚、 。 7
l、 ~ヽ
じしf_,)ノ
About Me
- plaintheweb
- The webblog covers the basic Internet competences and is supposed to serve as a manual for the people with disabilities and their assistants. The purpose of my webblog is to increase the accessibility of the Internet technologies for the people with learning disabilities and to implement the Web Content Accessibility Guidelines 2.0. There are as well the materials of my participatory camera workshop, aimed at sharing the skills and ideas during the adventurous insight in the shooting techniques. This workshop is for all those who are interested in creating new videos. Fresh ideas are welcome.
Wednesday, 18 February 2015

Thursday, 10 May 2012
The Juniper Tree Story app
Campaign for "The Juniper Tree Story", a graphic design for a mobile app prototype, is started at indiegogo.com. Join:
Tuesday, 14 February 2012
Basic Lighting 1
Three lights are used to create the lighting treatment: the key, fill and back lights.
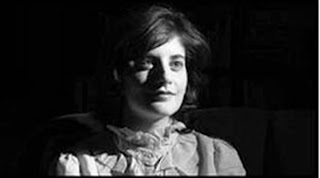
Key light ist that one light source around which you build your lighting scheme. It is usually the main provider of illumination to your film set or location. You „key“ your other lights, their quantity and quality off this main source. The key light may live anywhere around your object. It is traditionally placed 45 degrees (horizontally and vertically) off the axis of the camera’s lens and above the height of the talent’s head. This is normally a spotlight, and it reveals the shape and surface features of the subject. The key light produces harsh shadows.
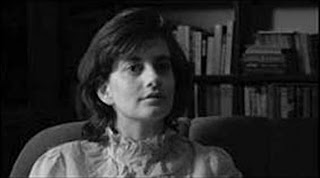
Fill light is a light source used to help control contrast. It „fills in“ the shadows often created by the brighter key light. The physical placement of the fill light is on the opposite side of the subject from the key light. Roughly 45 degrees (horizontally) off lens axis. The fill light also reduces the lighting contrast. The more the key light is offset, the more importance this soft fill light becomes.
Back light ist the light that defines an edge, or halo effect, around the backside of the subject. Because it lives behind
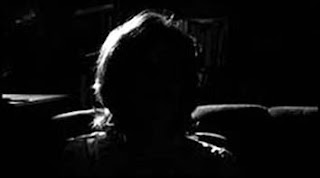 the subject (opposite side of the film set from the camera’s lens) and provides a light „rim“ to the outline of the subject, the back light serves to separte objects from the background and enhamce the illusion of depth within the film frame. The back light emphasizes the shape of the subject.
Three point lighting method is also known as „trinagle lighting“ or „photographic lighting“. The key light and back light may need to be reduced depending on the subject’s hair color. The fill light is usually
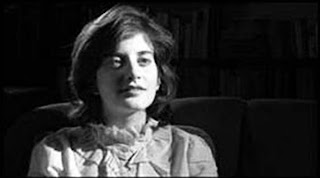
one-half or three-quarters the intensity of the key and back light. Wherever possible, additional lights can be used to illuminate the background behind the subject. But where space or facilities are limited, spill illumination from the key and fill lights may be used to cover the background areas.
Monday, 13 February 2012
Basic Lighting 2
 Front lighting tends to flatten out the face and be ratherb land in appearance. Depending on the height of the lamp, you may also cause a visible shadow on any surface behind the actor who is in front. Any lights at or below the talent’s physical height will throw sadows across the set, which will be visible to the camera lens and i soften not visually pleasing.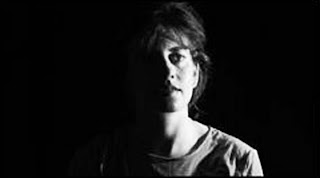
If the light is placed 90 degrees around the circle from the camera to subject axis, it is called side lighting and can generate a half-bright half-dark face split along the bridge of the nose.
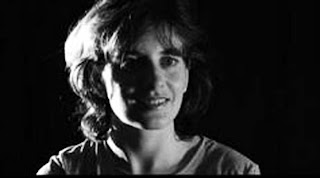
When the light is behind the subject but not exactly opposite to the camera lens it i soften called a kicker or a rim light – highlighting the edges of the hair, shoulders, and sometimes the jaw bone.
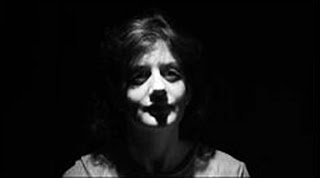
Light that comes from directly above (top lighting) will cause the brow ridges on most faces to block the light from the eye sockets. By keeping the eyes of the character in deep shadow you are taking away one very important way for the audience to relate to the character.
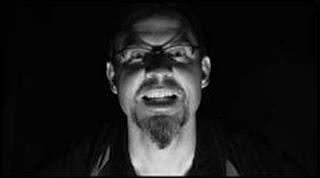
If you light from below, you are creating a rather unnatural lighting effect. As a result of this underlighting, the structure of the human face takes on a devilish appearance.
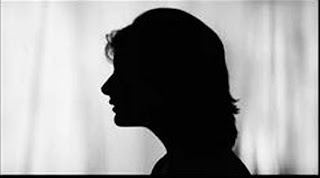
If you illuminate the background of your set and leave your talents’s face in darkness (with no fill light) and you expose fort he well-lit background, you will create what is called the sillouette effect.
Tuesday, 7 February 2012
Cutting Rules
It is important to figure out separate cuts during the shooting.
5-cut rule of the scene:
- includes shot and counter shot;
- total - face;
- reaction shot;
- hand;
- characteristic setting to solve the scene.
Rule: each sequence has in cut 5 settings, 4 sec. each. It is important to neutralize the cuts.
In between cuts /cut-aways, cut-ins, near, detail.
The means to get the cut in the shot are:
1. Mise en scene – the characters move in the shot itself.
2. Panoramic shot (when the camera moves, fixed on the tripod) might be horizontal, vertical, diagonal, and round. Another classification is:
round-up panorama
observation panorama
monitoring panorama
3. Traveling of the camera.
The combinations are possible as well, such as
4. Panorama + traveling
5. Mise en scene + camera movement
The blending could be used for the transition from one cut to another, but this solution is tasteless. The montage could be either invisible, or become a medium itself, according to different montage theories.
Three-point lighting is also known as “triangle lighting” or “photographic lighting.” Three lights are used to create the lighting treatment: the key, fill, and back lights.
Perspective and Composition
There are 4 basic variants of the camera perspective:
- objective camera /expressing the actions from the point of view of the author;
- subjective camera /participating in the actions from the point of view of the actor;
- “frog” perspective;
- “bird” perspective.
The angle of vision could differ from profile and frontal to the from the side. It is important to care of the backgrounds (not to embarrass the idea, to bring additional information); to care of the color balance; to care of the contrast and to avoid back-light.
According to the focal length the shot might be made as:
wide angle with maximal sharpness:

telescopic lens/ zoom with minimal sharpness

normal

fish eye

Please, notice, that you could maximize sharpness for the control of the attention.
Now let's talk about composition. The Eyes/Face/Gestures/Posture of the character matters. And additional features, such as scoping; framing; positioning in the shot and dynamics might be used.
The camera motion is an important factor for the film technics. Such camera movement could take place in the shot, as:
- the movement to the spectator
- the movement from the spectator
- the movement over the spectator.
The body of the camera itself moves as well:
- standing position in panoramic shot
- swing
- drive/approach, off, back, parallel, lift, pursuit/zoom,
- subjective camera.
Saturday, 4 February 2012
Sound Control
As sound are considered the voice, the music and the atmo of the film.
When possible, t is better to use the external microphone and headphones to control the sound. There are several kinds of microphones:
- directed mic. vs. spherical mic.
- dymanic vs. condensator
- slipper vs. windscreen
Rules:
- The phonogram shall not contain parts without sound or without mic. pause.
- The main sound at the background of the other sounds shall be emphasized; the background shall be distinguishably quieter.
- Each quiet or laud sound has to be recorded at the average noise level.
- Each long quiet sound shall have the comfort loudness.
- The silence is represented by the very quiet sounds.
- Short sounds could be set into the general sound background.
- Continuous sounds could not be butt joined.
- The phonogram could be presented both from the objective, as from the subjective points of view.
- The sounds as expressed not only realistically but also considering our ideas of the sound of the particular object.
- There are close up, medium and general shot in the sound, which is parallel to the size of the object in the shot.
- It is better to have the image too dark and the sound too quiet, than too bright and too laud.
- If the sound is important, in site of the change of the images, it should be recorder further (min. 60 sec.)
- For each location to record atmo ca. 30 sec.
Friday, 19 August 2011
Camera Workshop. Terms and Literature
Atmo (the main atmosphere, or “wild”) — the main sound, bounding the film atmosphere.
Cut — the “cut” or “take” is the most common transition when editing. It is an immediate switch from one shot to the next.
Firewire — a standard for transmission of data between digital equipment. A high-performance standard becoming one of the preferred methods of moving data in the media production world.
Jump Cut — an anomaly of the edited fi lm when two very similar shots of the same subject are cut together and played. A “jump” in space or time appears to have occurred, which often interrupts the viewer’s appreciation for the story being shown.
Perspective — a certain point of view.
Postproduction — the phase of motion picture creation that traditionally happens after all of the live-action film or video is shot. Postproduction can include picture and sound editing, title and graphics creation, motion effects rendering, color correction, musical scoring and mixing, etc.
Preproduction — the period of work on a motion picture project that occurs prior to the start of principal photography.
Production — the period of work on a motion picture project that occurs while the scenes are being recorded on fi lm or video. This could be as short as a single day for a commercial or music video or last several months for a feature fi lm.
Scene — a segment of a motion picture that takes place at one location. A scene may be composed of many shots from different camera angles or just one shot from one camera setup.
Sequence — the smallest film particle, combined of several settings.
Shot — one action or event that is recorded by one camera at one time. A shot is the smallest building block used to edit a motion picture.
Storyboards — drawings often done during preproduction of a motion picture that represent the best guess of what the ultimate framing and movement of camera shots will be when the fi lm goes into production. These comic book-like illustrations act as a template for the creative team when principal photography begins.
Take — each action, event, or dialogue delivery recorded in a shot may need to be repeated until its technical and creative aspects are done to the satisfaction of the filmmakers. Each time the camera rolls to record this repeated event is a “take. ” Takes are traditionally numbered starting at “one”.
Timeline — usually includes multiple tracks of video, audio, and graphics in a nonlinear editing system.
Tripod — a three-legged device, often with telescoping legs, used to support and steady the camera for motion picture shooting. The camera attaches to a device capable of vertical and horizontal axis movements called the tripod head, which sits atop the balancing legs.
Literature:
-- Michail Rabiger. Directing The Documentary. — New York: Focfl Press, 1998.
-- Johannes Kramarek, Rainer Pockrandt, Peter Kerstan - DuMont's Handbuch für praktische Filmgestaltung. – Köln: DuMont Buchverlag, 1986.
-- Dan Rahmel. Nuts and Bolts. Filmmaking. Practical Techniques for the Guerilla Filmmaker. - Focal Press, USA, 2004.
-- Fridhelm Büchele. Digitales Filmen. Verständlich erklärt. Einfach gute Videofilme drehen und nachbearbeiten. - Galileo Design, Bonn, 2005.
-- Roy Thompson, Christopher J. Bowen. Grammar of the Shot. Second Edition. – Focal Press, USA, 2009.
-- Robert B. Musburger. Single Camera Video Production. Fifth Edition. - Focal Press, USA, 2010.
-- Video Production Handbook. Fourth Edition - Gerald Millerson, Jim Owens, Focal Press, USA, 2008.
Practical Part
Getting started:
Write a production statement
At the very beginning of your project, perhaps before the script is even complete, you should write a production statement. This statement is a brief description of what the production is actually about.
It doesn’t even need to contain a plot summary. A production statement might read like one of these: “This 35-mm film will be a claustrophobic psychological murder mystery with gothic overtones”, “This commercial spec will provide a demonstration of the cutting edge compositing technology available from our effects house”, “This DV romantic comedy will be a light, surreal romp through the highways and byways of employee relationships in the banking system”.
Each of these single sentence abstracts tells the reader a great deal about the production.
To do list:
• Get an organizer or project folder for any film, you’ll have a million requests before you shoot one frame.
• Take note of other movies - there are many occasions where something you can use in your own.
• Don’t listen to criticism.
Storyboarding:
Storyboarding tells the story of a film visually in a series of comic-like panels. Storyboarding is a form of planning that enables a filmmaker to understand and recognize exactly what footage needs to be obtained to tell the desired story. Once the storyboards have been created, the panels can be re-arranged and augmented. Time is taken in preproduction to create the storyboards from a shooting script. Like the script, a storyboard is not the movie itself, but instead a blueprint or a guideline from which the movie can be dynamically created.
A storyboard can provide a visual checklist for an accurate idea of how much of the film is in the can. The most difficult estimation problem on a shooting schedule is determining how much can be shot in a single shooting day. Outside of your lead actor refusing
 to come out of his trailer, re-lighting for each new shot is probably the most time-consuming process that takes place in a shooting day.
A storyboard can help you determine how many shots you can make. A scene may only take up a single script page, but if you want to shoot it from 18 different angles, a dozen or more lighting set-ups may be required. Since each storyboard panel would show you a different angle, you can more accurately determine what is and isn’t possible in your shooting schedule.
Storyboarding allows you to see what props need to be rented for a shot or what locations can be faked or “cheated” to minimize expensive locations. The storyboards allow for much more accurate time and financial budgeting than a script alone.
You can get started by creating a simple sketch of the frame on the blank side.
Where to get the Camera?
It is not very difficult to find a video camera, even a professional one, if you live in acity or a large town. There always might be a film school or studio, where you could borrow a camera and other equipment for short time without of charge or for a reasonable fare. You could arrange there a studio for cutting and get a piece of advice as well.
Another one solution is a personal camcorder, which might be quite cheap or second hand and not necessary professional to learn the basic shot skills. Different models of cameras are available nowadays.
How to show your films?
After you finished your work, you might let the other people see it. One of the most accessible ways is to do it online. There are several websites, where you could for free upload your videos.
For instance:
Your public will be quite broad then – say it, worldwide. It is also practical, while you could get the feedback from the viewers – it is possible to leave comments on these websites.
Another one solution is to show your film to your friends and beloved ones, consider it as a good reason for the party. There are as well independent cinemas and alternative film projection initiatives in most of the social and cultural centrums, you could contact them and make an event, where not only the friends, but also the critics could come.
If you are reaaly confident that your work is worth to show to the people who are especially interested in film-making, feel free to send your film to one of the numerous local or international film festivals.
Theory Part
Theory part:
- What for?
Film-making is a wonderful activity and lifestyle. There are not so many genres of art which let you to save your memories and to realize your dreams. The film is one of the best. With a video camera you could document everyday life, develop your imagination and share your ideas with the other people. Nowadays you could make a film even using the mobile phone, if it has a built-in one, and upload it online almost at the same time.
A Good Shot. Camera workshop
Participatory camera workshop, aimed at sharing the skills and ideas during 2 hours of the adventurous insight in the shooting techniques. Up to 15 participants with different backgrounds will try to create a friendly atmosphere for the communication, cooperation and learning.
This workshop is for all those who are interested in creating new videos. Fresh ideas are welcome.
If you have a video camera, bring it with. One simple video camera for those who do not have their own will be provided. If you want to share your equipment with other participants, it is wonderful. Please, bring it and share.
Structure of the workshop:
- Timing of the workshop:
45 min. theory/15 min. pause/45 min. practice.
Basic Shots
1. How to construct the shot?
Before the shooting it is important to do:
- to do location scout
- to consider intellectual rights
- to do time planning
- to obtain requisite
- to write the plan of filming.
1. Extreme Long Shot

1. Also referred to as a "very wide shot" or a "very
wide angle shot".
2. Traditionally used in exterior shooting.
3. Encompasses a large field of view.
4. Often used as an establishing shot at the beginning of a motion
picture or at the start of a new sequence within a motion picture.
5. Shows where/ when/ who.

2. Very Long Shot
1. May be used in exterior or interior shooting when enough width and height exist within the studio set or location building.
2. Environment within the film space is still very important.
3. May be used as an establishing shot where movement of character brings the figure closer to the camera.
2. Environment within the film space is still very important.
3. May be used as an establishing shot where movement of character brings the figure closer to the camera.
4. Shows where/ when/ who.
3. Long Shot/ Wide Shot
 1. This is usually considered a “full body” shot, wide but in close to a figure with hea d and feet visible in the frame.
 2. Interior or exterior.
3. Is most prominent in the frame, eyes and the direction they look clothing, hair color, and style are all plainly visible.
2. Interior or exterior.
3. Is most prominent in the frame, eyes and the direction they look clothing, hair color, and style are all plainly visible.

4. An audience is supposed to be watching the human face at this point in the framing so actions or objects in the surrounding environment hold little to no importance.
 2. Interior or exterior.
 2. Lacking any points of reference to the surrounding environment, the audience has no context in which to place this body part detail, so understanding will stem from how or when this shot is edited into the motion picture.
3. Long Shot/ Wide Shot
1. This is usually considered a “full body” shot, wide but in close to a figure with hea d and feet visible in the frame.
2. Interior or exterior shooting.
3. Larger human figure takes attention away from the environment; however, a fair amount of the character’s surroundings is still visible.
4. May not work well for an establishing shot.
5. Shows where/ when/ who.
 1. Increases magnitude. The bottom of frame cuts off the leg either just below or, more commonly, just above the knee. In the last case it is sometimes referred to as the “Cowboy” because in American Western movies the firearm in the holster strapped to the thigh of a cowboy is shown.
4. Medium Long Shot
1. Increases magnitude. The bottom of frame cuts off the leg either just below or, more commonly, just above the knee. In the last case it is sometimes referred to as the “Cowboy” because in American Western movies the firearm in the holster strapped to the thigh of a cowboy is shown.
2. May be interior or exterior shot.
3. Human figure is prominent; details in clothing, gender, and facial expressions are visible.
4. Shows who/where/when.
5. Medium Shot
1. Or the “Waist” shot, as the frame cuts off the human figure just below the waist and just above the wrist if arms are down at the side.
2. Interior or exterior.
4. Subject movement may become a concern, as the tighter
framing restricts the freedom of gesture - be careful not to break frame.
5. Shows who/where/when.
6. Medium Close-Up
1. Or the “two-button” for the tight bottom frame cutting off at the chest, roughly
where you would see the top two buttons on a shirt. Definitely cuts off above the elbow joint.
2. Interior or exterior.
3. Character’s facial features are rather clear — where the eyes look is obvious, as is emotion, hair style and color, make-up, etc. This is one of the most commonly used shots in filmmaking.
5. Shows where/when.
7. Close-Up
1. Sometimes called a “head shot”, as the framing may cut off the top of the
subject’s hair and the bottom of the frame can begin anywhere just below the chin
or with a little upper shoulder visible.
2. Interior or exterior.
3. A very intimate full face shot of a human subject showing all detail in the eyes and conveys the subtle emotions that play across the eyes, mouth, and facial muscles of an actor.
4. An audience member should be totally focused on the human face with this framing, especially the eyes and/or mouth.
5. Shows who but not so much where/when.
8. Big Close-Up
1. Human face occupies as much of the frame as possible and still shows the key
features of eyes, nose, and mouth at once.
2. Interior or exterior.
3. Such an intimate shot puts the audience directly in the face of the subject - because
every detail of the face is highly visible, facial movements or expressions need to be
subtle - very little head movement can be tolerated before the subject moves out of frame.
4. Shows who and how that “who” feels.
9. Extreme Close-Up
1. Purely a detail shot - framing favors one aspect of a subject such as his/her eyes, mouth, ear, or hand.
2. Lacking any points of reference to the surrounding environment, the audience has no context in which to place this body part detail, so understanding will stem from how or when this shot is edited into the motion picture.
3. This type of extremely magnified imagery can be used in documentaries (medical films or scientific studies), and in fictional and experimental art films.
Wednesday, 2 February 2011
Vocabulary
e-mail
Electronic mail or e-mail, is a means to exchange digital letters or messages. Each person could get her or his unique e-mail address to receive and send the messages over the Internet. An e-mail message consists of two parts - the message header with the e-mail address and the letter itself.
search engine
A web search engine searches for information on the Internet. The search results may consist of webpages, images, information and other types of files. Search engines operate automatically.
social network
A social network is an online service or website that connects the people who share the same interests and/or activities. Each user could create a profile and interact with friends over the Internet.
account
Using the Internet services, such as social networks, demands that each user has an account which consists of a username and a password to log into the network, and besides screen name and nickname.
profile
A user profile is a collection of personal data connected with a specific user which represents a person's identity on the Internet.
webpage
A webpage is a document written in the computer language (for example HTML) for the Internet. It can be accessed through a web browser and displayed on a computer monitor or mobile device. This information is usually connected with other webpages through the links.
website
A website is a collection of related web pages, images, and videos with a common address. All publicly accessible websites together are the World Wide Web.
chat
A chat is a means of direct one-on-one communication over the Internet, using special software such as instant messengers. With help of them you can communicate with your friends who are online.
Tuesday, 1 February 2011
How to Create a Website or Webblog?
- What is a website?

- Which kinds of websites are there on the Internet?
- How to create a website?
Now, when you learned how to create an e-mail account, how to upload and download files, how to publish images and texts on the Internet, it will be easy for you to make one step further and create your own webpage.
Think about what you will write on your webpage, try to choose a special topic. It could be a webblog or online diary, where you could leave your impressions. Or you could collect links to the articles which seem interesting to you or republish the articles you read somewhere else (it is not so much welcomed). The webpage might not be text-only, pictures, photos and videos will make it more interesting. You could also use the webblog for writing local or private news.
It is easy to create a webpage template. Look up for free HTML tutorials online which will help you to find a way to create your own webpage. A webpage template makes the task of building a website fairly fast and easy. To lay out the website you need to use Hypertext Mark-up Language (HTML) code, the main computer language of the Internet. It controls everything that you can see on the webpage like colors, boxes, text, and animations. So, it is useful to learn the necessary HTML language tags first, before trying to create a webpage template. It is a simple computer language and you can start working without too much special knowledge.
Here are the steps to create a webpage template:
1. Study how to create HTML tables. This will help you in creating columns for your webpage.
2. Become familiar with HTML color codes. Your colors should be simple and eye-friendly. Coordinate your webpage colors and create a professional look to your viewers.
3. Prepare images and logos to place in your webpage. The files in JPG or GIF format have to be of 800 x 400 pixel size.
4. Configure your webpage width. Set your monitor resolutions to a width of 1024 pixels wide instead of the old fashioned 800 by 600 pixels width setting. It is better to have a fixed width setting.
5. Know the basics parts of the template diagram. Your webpage contents should be split up into different parts or tables to load it faster. Since the webpage is made up of different tables, a template diagram will help you have a better picture of
 what your webpage should look like. You could choose a template diagram that will suit your needs. Basically, your template diagram should have tables with the heading, the body and navigation controls, optional navigation tools, and footer.
6. Create sample of the webpages first. Do not settle on just one template. If you create several drafts, you could choose the best afterwards. Consider the layout of your template. It should be user-friendly, and the colors which you use should match to each other. Make sure that the tables do not overlap and webpage loading time does not take too long to irritate your visitors. Once you like what you see, you can move on to creating the content for your webpage.
Used Words:
Website - related web pages, images, and videos with a common address. All publicly accessible websites together are the World Wide Web.

Template - a special Internet tool which helps to create web-sites.
Required Tools:
* Computer with Internet connection.
* Enough understanding of computer security while using online resources.
* Basic knowledge of the HTML.
Useful Links:
How to Publish Images on the Internet?

- Which image formats are suitable for the Internet?
- Where to store the images online?
One of the most popular image formats for the computers is the Joint Photographic Experts Group or JPEG. Many pictures from digital cameras are JPEG files. They are suitable for compression and upload. So, you could easily share the images from your camera or your computer with other people, if you publish them on the Internet.
1. You could send the files via the Inernet if you attach them to the e-mail. When you are writing your e-mail, look for a button "attach files". When the menu appears, click “browse” and select the JPEG files on your computer which you want to upload. Remember, it will now take longer to send your e-mail.
2. Use a free online service to store your files. There are many websites where you could upload your photos for free, for example Photobucket, ImageShack and Picasaweb. Flickr.com is also one of the popular services, but you can only upload there up to a certain file size, if you are using a free account. If you pay for the service, you can upload more images and the bigger images equivalent up to one gigabyte. Photowebsites are a useful way to learn the photo technique, while you could comment on the other people’s photos and discuss them. To use these websites, you need to sign up with your e-mail account, create a password and a user account. Some of the websites become owners of your images, which you upload there. It might be not in your interest as an artist or photographer. So, you should read the “Terms of Service” first to see the rules of the website where you are going to present your photos.
3. You could also send your images through a chat program. In many chat programs (such as AIM, and Yahoo! Messenger) you could show a picture to a person you are talking to. Most of the time, you will see a small button in your chat window that looks like a picture. Click on it and share the file with your friend.
 If your file is too big, many websites will resize it to an adequate file size. Sending through the e-mail won't resize it, and the larger the file is, the longer it takes to send and receive it. Consider that some people have electronic mailboxes that are of a certain size, and a large file might just fill them up.
4. You could also upload your images and share them with your friends through the social network.
Required Tools:
* Computer with Internet connection.
* Enough understanding of computer security while using online resources.
* Enough understanding of the copyright policy on the Internet.
Quick Tips:
* Resizing images makes file transfers faster and easier.
Used Words:
JPEG - a method of compression for digital images.
file sharing - allows the access to the information in the digital form, such as computer programs, multi-media (audio, video), documents, or electronic books.
user account - a special registration which allows a user the access to a computer system, or e-mail.
server - a computer program which supports the work of other programs, which may or may not be running on the same computer.
Useful Links:
Subscribe to:
Posts (Atom)