Dear readers, I am really happy with the stable traffic on this webblog for all these 4 years, and hope that you find the articles published here useful. However, I have migrated. My new project is dedicated to photography. Enjoy: https://backseatzzz.wordpress.com/
_/、
( ゚、 。 7
l、 ~ヽ
じしf_,)ノ
About Me
- plaintheweb
- The webblog covers the basic Internet competences and is supposed to serve as a manual for the people with disabilities and their assistants. The purpose of my webblog is to increase the accessibility of the Internet technologies for the people with learning disabilities and to implement the Web Content Accessibility Guidelines 2.0. There are as well the materials of my participatory camera workshop, aimed at sharing the skills and ideas during the adventurous insight in the shooting techniques. This workshop is for all those who are interested in creating new videos. Fresh ideas are welcome.
Wednesday 18 February 2015
Thursday 10 May 2012
The Juniper Tree Story app
Campaign for "The Juniper Tree Story", a graphic design for a mobile app prototype, is started at indiegogo.com. Join:
Tuesday 14 February 2012
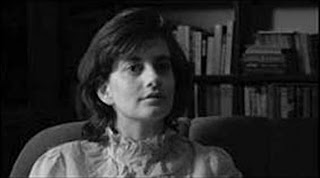
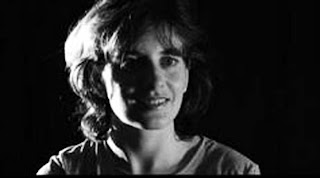
Basic Lighting 1
Three lights are used to create the lighting treatment: the key, fill and back lights.

Key light ist that one light source around which you build your lighting scheme. It is usually the main provider of illumination to your film set or location. You „key“ your other lights, their quantity and quality off this main source. The key light may live anywhere around your object. It is traditionally placed 45 degrees (horizontally and vertically) off the axis of the camera’s lens and above the height of the talent’s head. This is normally a spotlight, and it reveals the shape and surface features of the subject. The key light produces harsh shadows.
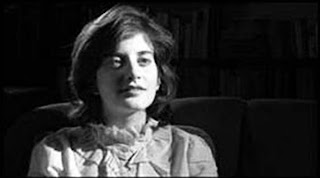
Fill light is a light source used to help control contrast. It „fills in“ the shadows often created by the brighter key light. The physical placement of the fill light is on the opposite side of the subject from the key light. Roughly 45 degrees (horizontally) off lens axis. The fill light also reduces the lighting contrast. The more the key light is offset, the more importance this soft fill light becomes.
Back light ist the light that defines an edge, or halo effect, around the backside of the subject. Because it lives behind
 the subject (opposite side of the film set from the camera’s lens) and provides a light „rim“ to the outline of the subject, the back light serves to separte objects from the background and enhamce the illusion of depth within the film frame. The back light emphasizes the shape of the subject.
Three point lighting method is also known as „trinagle lighting“ or „photographic lighting“. The key light and back light may need to be reduced depending on the subject’s hair color. The fill light is usually
one-half or three-quarters the intensity of the key and back light. Wherever possible, additional lights can be used to illuminate the background behind the subject. But where space or facilities are limited, spill illumination from the key and fill lights may be used to cover the background areas.
Monday 13 February 2012
Basic Lighting 2
 Front lighting tends to flatten out the face and be ratherb land in appearance. Depending on the height of the lamp, you may also cause a visible shadow on any surface behind the actor who is in front. Any lights at or below the talent’s physical height will throw sadows across the set, which will be visible to the camera lens and i soften not visually pleasing.
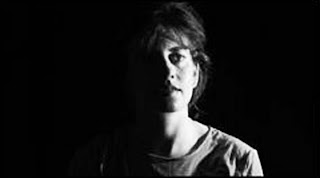
If the light is placed 90 degrees around the circle from the camera to subject axis, it is called side lighting and can generate a half-bright half-dark face split along the bridge of the nose.
When the light is behind the subject but not exactly opposite to the camera lens it i soften called a kicker or a rim light – highlighting the edges of the hair, shoulders, and sometimes the jaw bone.
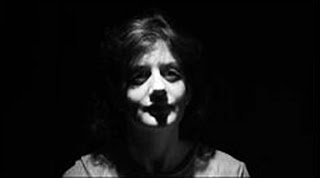
Light that comes from directly above (top lighting) will cause the brow ridges on most faces to block the light from the eye sockets. By keeping the eyes of the character in deep shadow you are taking away one very important way for the audience to relate to the character.
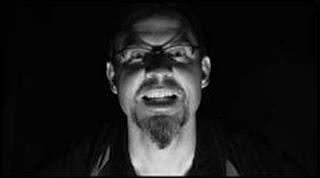
If you light from below, you are creating a rather unnatural lighting effect. As a result of this underlighting, the structure of the human face takes on a devilish appearance.
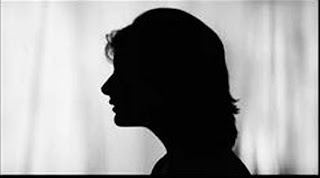
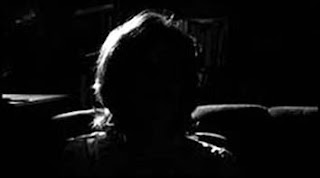
If you illuminate the background of your set and leave your talents’s face in darkness (with no fill light) and you expose fort he well-lit background, you will create what is called the sillouette effect.
Tuesday 7 February 2012
Cutting Rules
It is important to figure out separate cuts during the shooting.
5-cut rule of the scene:
- includes shot and counter shot;
- total - face;
- reaction shot;
- hand;
- characteristic setting to solve the scene.
Rule: each sequence has in cut 5 settings, 4 sec. each. It is important to neutralize the cuts.
In between cuts /cut-aways, cut-ins, near, detail.
The means to get the cut in the shot are:
1. Mise en scene – the characters move in the shot itself.
2. Panoramic shot (when the camera moves, fixed on the tripod) might be horizontal, vertical, diagonal, and round. Another classification is:
round-up panorama
observation panorama
monitoring panorama
3. Traveling of the camera.
The combinations are possible as well, such as
4. Panorama + traveling
5. Mise en scene + camera movement
The blending could be used for the transition from one cut to another, but this solution is tasteless. The montage could be either invisible, or become a medium itself, according to different montage theories.
Three-point lighting is also known as “triangle lighting” or “photographic lighting.” Three lights are used to create the lighting treatment: the key, fill, and back lights.
Perspective and Composition
There are 4 basic variants of the camera perspective:
- objective camera /expressing the actions from the point of view of the author;
- subjective camera /participating in the actions from the point of view of the actor;
- “frog” perspective;
- “bird” perspective.
The angle of vision could differ from profile and frontal to the from the side. It is important to care of the backgrounds (not to embarrass the idea, to bring additional information); to care of the color balance; to care of the contrast and to avoid back-light.
According to the focal length the shot might be made as:
wide angle with maximal sharpness:

telescopic lens/ zoom with minimal sharpness

normal

fish eye

Please, notice, that you could maximize sharpness for the control of the attention.
Now let's talk about composition. The Eyes/Face/Gestures/Posture of the character matters. And additional features, such as scoping; framing; positioning in the shot and dynamics might be used.
The camera motion is an important factor for the film technics. Such camera movement could take place in the shot, as:
- the movement to the spectator
- the movement from the spectator
- the movement over the spectator.
The body of the camera itself moves as well:
- standing position in panoramic shot
- swing
- drive/approach, off, back, parallel, lift, pursuit/zoom,
- subjective camera.
Saturday 4 February 2012
Sound Control
As sound are considered the voice, the music and the atmo of the film.
When possible, t is better to use the external microphone and headphones to control the sound. There are several kinds of microphones:
- directed mic. vs. spherical mic.
- dymanic vs. condensator
- slipper vs. windscreen
Rules:
- The phonogram shall not contain parts without sound or without mic. pause.
- The main sound at the background of the other sounds shall be emphasized; the background shall be distinguishably quieter.
- Each quiet or laud sound has to be recorded at the average noise level.
- Each long quiet sound shall have the comfort loudness.
- The silence is represented by the very quiet sounds.
- Short sounds could be set into the general sound background.
- Continuous sounds could not be butt joined.
- The phonogram could be presented both from the objective, as from the subjective points of view.
- The sounds as expressed not only realistically but also considering our ideas of the sound of the particular object.
- There are close up, medium and general shot in the sound, which is parallel to the size of the object in the shot.
- It is better to have the image too dark and the sound too quiet, than too bright and too laud.
- If the sound is important, in site of the change of the images, it should be recorder further (min. 60 sec.)
- For each location to record atmo ca. 30 sec.
Subscribe to:
Posts (Atom)